
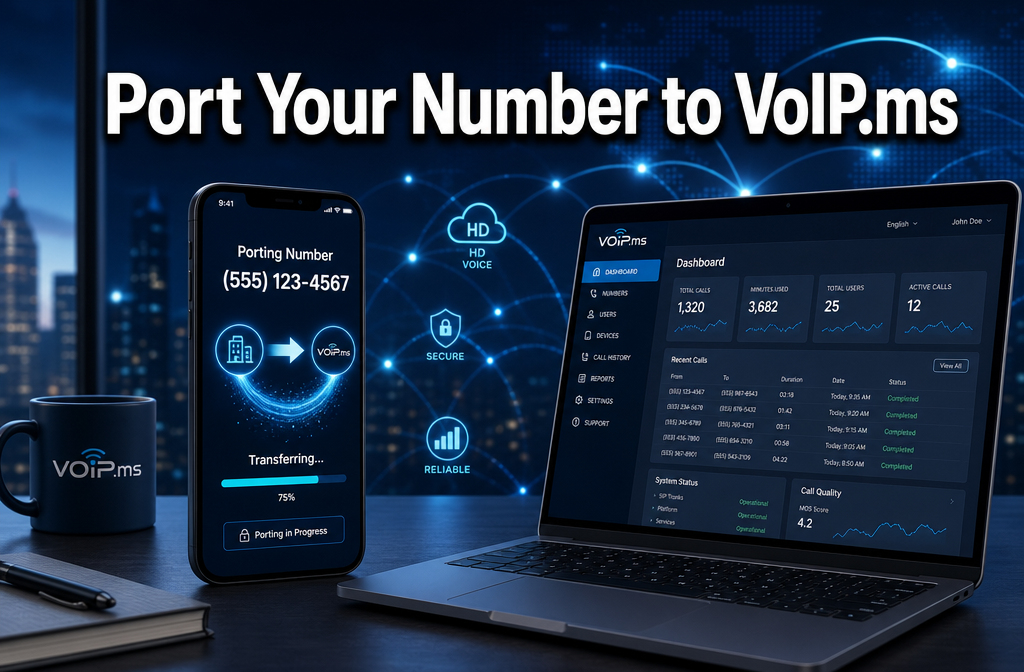
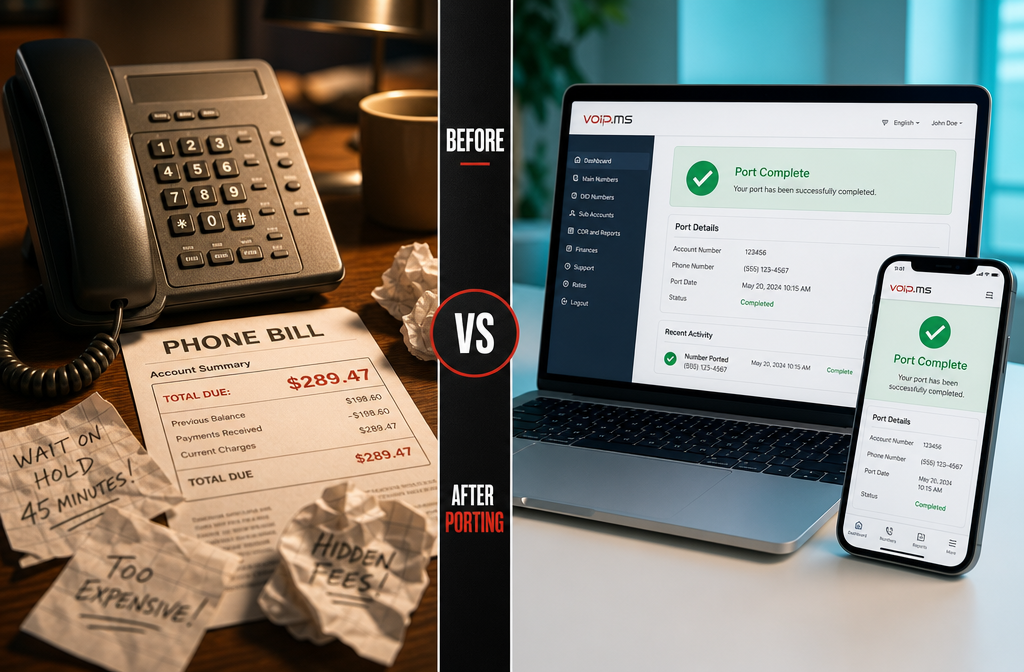
Over 40% of businesses that switch to VoIP report cutting their phone bills by half — yet many delay the move simply because they don’t know how to bring their existing number along. Learning how to port your number to VoIP.ms removes that final barrier and lets you keep the number your clients already know, while gaining the flexibility and cost savings of a modern cloud phone system.
This guide walks through every stage of the porting process — from eligibility checks to post-port configuration — so the transition is smooth and stress-free.
Key Takeaways 📋
- Number porting (also called LNP — Local Number Portability) lets you move an existing phone number to VoIP.ms without changing it.
- Most US and Canadian numbers are portable, but eligibility must be confirmed before submitting a request.
- The process typically takes 5–10 business days after a complete, accurate request is submitted.
- Having your account number, PIN, and a signed LOA ready speeds up approval significantly.
- Porting is free on VoIP.ms, though your current carrier may charge a release fee.
Understanding Number Porting and Why VoIP.ms Is Worth It
Before diving into how to port your number to VoIP.ms, it helps to understand what porting actually means. Local Number Portability (LNP) is a regulatory right in the US and Canada that allows consumers and businesses to transfer a phone number from one carrier to another without losing the number itself.
VoIP.ms is a Canadian-based VoIP provider that offers:
| Feature | Detail |
|---|---|
| Per-minute billing | As low as $0.009/min (US) |
| DID numbers | Available in hundreds of area codes |
| SIP trunk support | Compatible with most IP-PBX systems |
| Free inbound calls | On most plans |
| Porting fee | $0 (no charge from VoIP.ms) |
💡 Pull Quote: “Porting your number costs nothing on VoIP.ms — the only potential fee comes from your current carrier’s release policy.”
Types of Numbers That Can Be Ported
Not every number is portable. Here’s a quick breakdown:
- ✅ Landline numbers — Generally portable
- ✅ Mobile/cell numbers — Portable in most cases
- ✅ VoIP numbers from other providers — Usually portable
- ❌ Toll-free numbers (800, 888, etc.) — Require a separate toll-free porting process
- ❌ Numbers tied to active DSL service — May require DSL migration first
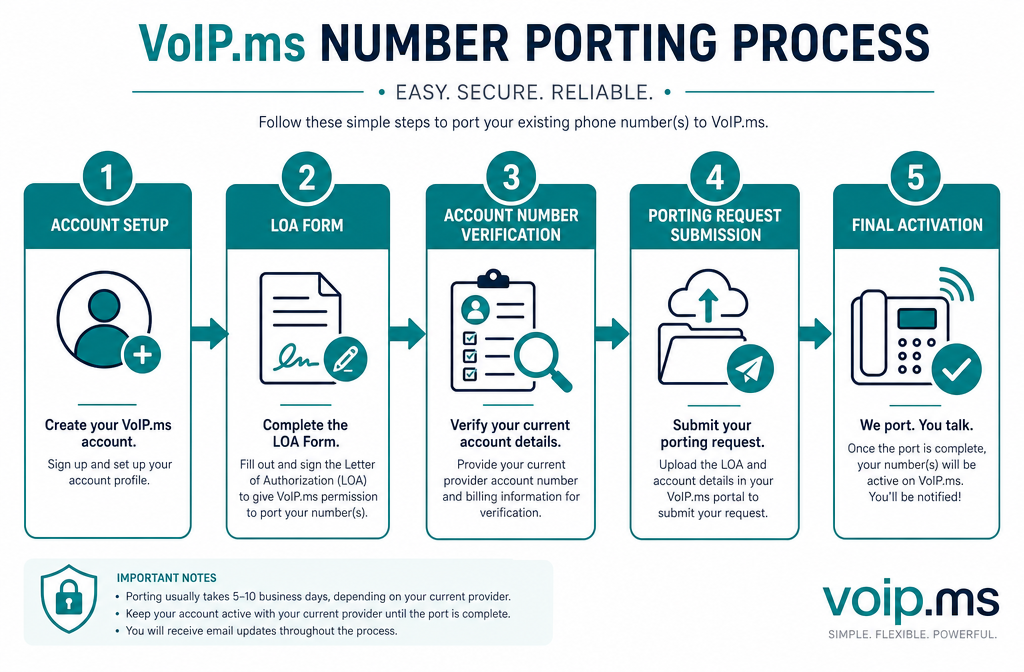
Step-by-Step: How to Port Your Number to VoIP.ms
The porting process has five clear stages. Following each one carefully reduces delays and rejections.
Step 1: Verify Your Number Is Eligible
Before anything else, confirm the number can be ported. Log into your VoIP.ms account, navigate to DID Numbers → Order DID, and use the porting eligibility tool. Alternatively, contact VoIP.ms support with the number in question.
What to check:
- The number is active with your current carrier
- There are no outstanding balances on the account
- The number is not part of a contract with early termination fees
Step 2: Gather Required Information
Porting requests fail most often because of missing or incorrect account details. Collect the following before submitting:
- 📄 Account number — Found on your current carrier’s bill or online portal
- 🔐 Account PIN or passcode — The security PIN on file with your carrier
- 📍 Service address — Must match exactly what your carrier has on record
- 📝 Authorized name — The name listed on the account
⚠️ Important: Even a small mismatch — like “St.” vs. “Street” — can cause a rejection. Double-check every field.
Step 3: Submit a Letter of Authorization (LOA)
The LOA is a legal document that authorizes VoIP.ms to request the number transfer on your behalf. VoIP.ms provides a downloadable LOA template in the customer portal.
How to complete the LOA:
- Download the LOA from DID Numbers → Port Request
- Fill in your name, address, account number, and the number(s) to be ported
- Sign and date the document
- Upload it directly through the portal or email it to [email protected]
Step 4: Submit the Porting Request
With the LOA signed and account details confirmed, submit the formal port request:
- Log into voip.ms
- Go to DID Numbers → Port Request → New Port Request
- Enter the number, carrier name, account details, and service address
- Upload the signed LOA
- Click Submit
VoIP.ms will acknowledge receipt and provide a Firm Order Commitment (FOC) date — the scheduled date when the number officially transfers.
Step 5: Prepare Your VoIP.ms Account for the Ported Number
Don’t wait until porting is complete to configure your account. Set up the following in advance:
- SIP device or softphone — Configure your IP phone or app with VoIP.ms SIP credentials
- IVR/Auto-attendant — Build your call routing menu if needed
- Voicemail — Set up a mailbox under the incoming DID settings
- Failover routing — Add a backup number in case of connectivity issues
Common Porting Problems and How to Avoid Them
Even a well-prepared request can hit snags. Here are the most frequent issues encountered when learning how to port your number to VoIP.ms — and how to prevent them.
Rejection Due to Account Mismatch
Cause: The name or address submitted doesn’t match the carrier’s records. Fix: Call your current carrier and ask them to read back the exact account name and address on file. Use that exact format on the LOA.
Delay Because of Active DSL
Cause: Some landline numbers are bundled with DSL internet service. Fix: Contact your carrier to separate (or “unbundle”) the voice line from the DSL before initiating the port.
Carrier Refuses to Release the Number
Cause: Outstanding balance or contract lock-in. Fix: Pay any balance in full. If under contract, review the terms — porting is a legal right in the US and Canada, though ETF fees may still apply.
Port Request Stuck in “Pending”
Cause: Incomplete documentation or carrier processing delays. Fix: Check the VoIP.ms portal for status updates. If stuck beyond 10 business days, contact VoIP.ms support with your port request ID.
After the Port: Configuring Your New VoIP.ms Number
Once the number has successfully ported, a few final steps ensure everything works correctly.
Test Inbound and Outbound Calls
- Call the ported number from an external phone to confirm it rings correctly
- Make an outbound call and verify the caller ID displays the ported number
- Test voicemail, call forwarding, and any IVR menus
Update Business Listings
Even though the number stays the same, it’s good practice to verify that all business listings — Google Business Profile, Yelp, website contact pages — still display the correct number.
Cancel Your Old Service
Once porting is confirmed and tested, contact your previous carrier to cancel the old account. Keep the account open until the port is 100% complete — canceling early can disrupt or invalidate the transfer.
Porting Timeline: What to Expect
| Stage | Typical Timeframe |
|---|---|
| Eligibility check | Same day |
| LOA preparation and submission | 1–2 days |
| Carrier processing | 3–7 business days |
| FOC date confirmation | Within 2–3 days of submission |
| Number goes live on VoIP.ms | On the FOC date |
| Full testing and configuration | 1 day |
Total estimated time: 5–10 business days for most straightforward ports.
Conclusion: Take the Next Step Today
Knowing how to port your number to VoIP.ms is the key to unlocking significant savings and flexibility without sacrificing the phone number your contacts already have. The process is methodical but entirely manageable when approached step by step.
Actionable next steps:
- ✅ Log into VoIP.ms (or create a free account) and run an eligibility check on your number
- ✅ Gather your current carrier’s account number, PIN, and service address
- ✅ Download and complete the LOA from the VoIP.ms portal
- ✅ Submit the port request and note the FOC date
- ✅ Pre-configure your SIP devices and call routing before the FOC date arrives
The switch to VoIP.ms doesn’t have to mean starting over. With a successful port, the transition is invisible to callers — and the savings are very visible on the monthly bill.
References
- Federal Communications Commission. (2023). Local Number Portability. https://www.fcc.gov/consumers/guides/porting-keeping-your-phone-number-when-you-change-providers
- CRTC. (2007). Telecom Decision CRTC 2007-22: Local number portability. https://crtc.gc.ca/eng/archive/2007/dt2007-22.htm
- VoIP.ms. (2024). Number porting FAQ and instructions. https://wiki.voip.ms/article/Number_Porting
- Vonage Business. (2022). VoIP adoption statistics and cost savings report. https://www.vonage.com/resources/articles/voip-statistics/