
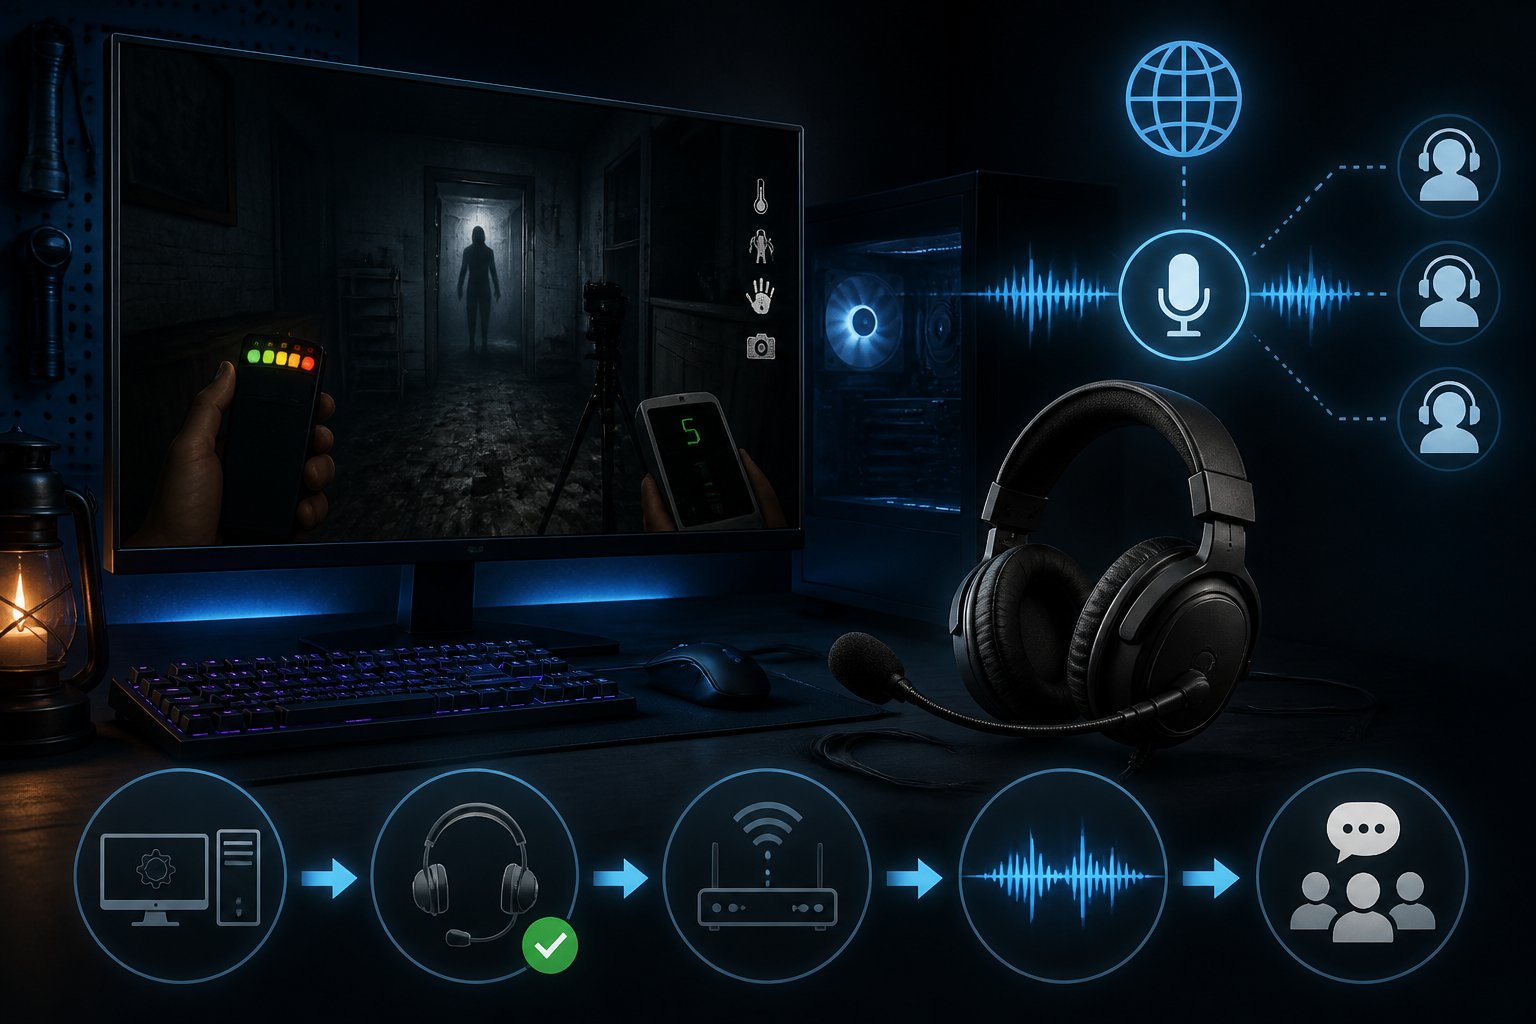
Phasmophobia relies heavily on voice chat to let you communicate with your team and interact with ghosts during investigations. The game uses the Vivox voice chat system built directly into Phasmophobia, so you don’t need to set up external VoIP software to talk with other players. However, getting your microphone and voice recognition working properly requires some specific configuration steps.
Many players run into problems with their microphone not picking up their voice or other teammates not hearing them clearly. These issues often come from incorrect Windows permissions, wrong in-game settings, or network problems blocking the voice server connection. Understanding how local chat and global chat work differently will help you figure out what needs fixing.
This guide walks you through everything from basic audio setup to advanced troubleshooting for voice chat problems in Phasmophobia. You’ll learn how to configure your microphone settings, adjust voice recognition options, and resolve common technical issues that prevent smooth communication during your ghost hunts.
Understanding In-Game Voice Features
Phasmophobia uses two distinct voice systems that serve different purposes during ghost hunts. Voice chat connects you with teammates, while voice recognition lets the game detect specific words you say to interact with ghosts and trigger responses.
How Voice Chat Works in Phasmophobia
Phasmophobia uses the Vivox voice chat system to enable communication between players. This system operates on a proximity basis, meaning you can only hear teammates who are within 20 meters of your location.
The voice chat creates an interesting dynamic when players die. Dead players can hear living teammates, but living players cannot hear the dead. This one-way communication adds tension during investigations.
You have three options for transmitting voice chat. Push-to-talk requires you to hold a button while speaking. Voice activation picks up your voice automatically when you talk. Toggle mode lets you turn your microphone on or off with a single button press.
Role of Voice Recognition in Gameplay
The game uses Vosk as its voice recognition system, which runs separately from player voice chat. This feature listens for specific phrases and words that ghosts respond to during your investigation.
Voice recognition affects ghost behavior directly. When you say the ghost’s name, ask questions, or use certain trigger words, the ghost may respond through EMF readings, ghost orbs, or direct manifestations. Some ghosts react more aggressively to voice input than others.
You need to set your language preference in the game’s settings for voice recognition to work properly. The system supports multiple languages, but you must match your spoken language with the voice language setting in the options menu.
Important limitations:
- Only works on Windows 10 (Windows 11 may have issues)
- Requires proper microphone permissions
- Must be configured separately from voice chat
Interacting with the Spirit Box
The spirit box is a ghost-hunting tool that requires voice recognition to function. You must speak questions directly into your microphone while holding the spirit box in a dark room for the ghost to potentially respond.
Common questions that trigger responses include “Where are you?”, “How old are you?”, and “Give us a sign.” The ghost typically responds through the spirit box with words like “behind,” “close,” or “here.” You must be alone in the room or have the lights off for most ghosts to communicate through this device.
Your microphone sensitivity affects spirit box effectiveness. If your voice recognition isn’t detecting your speech during the voice recognition test in audio options, the spirit box won’t register your questions either.
Configuring Audio and Microphone Settings
Getting your microphone set up correctly in Phasmophobia requires selecting the right input device, confirming the game can detect your voice, and fine-tuning volume levels to ensure ghosts respond to your commands.
Selecting the Correct Input Device
Open Phasmophobia and navigate to Options, then click on the Audio tab. Look for the Input Device dropdown menu at the top of the settings panel.
Click the dropdown to see all available microphones connected to your computer. Select your primary microphone from the list. If you use a headset, choose the headset microphone instead of any built-in laptop or webcam mics.
The game defaults to your system’s default recording device. If you’re unsure which microphone to pick, check your Windows sound settings first by right-clicking the speaker icon in your taskbar. Make sure the microphone you select in Phasmophobia voice chat matches your Windows input device.
Testing Voice Recognition in Game
After selecting your input device, look for the microphone level indicator in the audio menu. This bar moves in real time when the game detects sound from your microphone.
Speak normally into your microphone while watching the indicator bar. The bar should jump and fill with color as you talk. If it stays still, the game isn’t picking up your voice.
You can also run a voice recognition test by starting a single-player game and using the Spirit Box. Ask simple questions like “how old are you” or “where are you” to confirm the ghost can hear you. The Spirit Box will respond with static or words if voice recognition is working properly.
Adjusting Microphone Volume and Sensitivity
Find the Microphone Volume slider in the audio settings menu. This controls how loud your voice appears to the game. Set it between 75-100% for most microphones.
Below that, locate the Microphone Sensitivity slider. This determines how soft a sound needs to be before the game ignores it. Higher sensitivity means the game picks up quieter sounds, including background noise.
Start with sensitivity around 50% and adjust up if teammates can’t hear you clearly. Lower it if the game picks up too much room noise or breathing. During hunts, ghosts can track any sound your microphone detects, so finding the right balance matters for gameplay.
Test your settings by speaking at normal volume in the truck before entering the building. Your teammates should hear you clearly without distortion or cutting out.
Speech Language and Recognition Setup
Phasmophobia relies on your Windows speech recognition settings to understand voice commands. The game needs the correct language pack installed on your computer to process what you say.
Go to Windows Settings, then Time & Language, and click on Speech. Verify that your speech language matches the language you speak. Download the language pack if it’s missing.
The game works best with English language packs, as ghost responses and voice commands are programmed primarily in English. If you speak another language, ghost interactions through voice recognition may not trigger consistently.
Return to game settings after confirming your Windows speech language is set correctly. Some players find that restarting the game after changing Windows speech settings helps the voice recognition system initialize properly.
Troubleshooting Common Voice Chat Issues
Microphone permissions often block voice chat from working correctly, while incorrect push-to-talk settings and software overlays can prevent other players from hearing you in-game.
Resolving Microphone Permission Problems
You need to grant Phasmophobia access to your microphone through Windows settings. Open Settings and go to Privacy & Security, then Microphone. Turn on microphone access for apps and scroll down to find Phasmophobia in the list.
Make sure the toggle is enabled for the game.
If you’re getting a failed to connect to voice server error, run Steam as administrator. Navigate to your Phasmophobia installation folder, right-click Phasmophobia.exe, and select Properties. Go to the Compatibility tab and check “Run this program as an administrator.”
Your firewall might also be blocking the connection. Add Phasmophobia as an exception in Windows Defender Firewall or your antivirus software. Some networks like college Wi-Fi or restricted countries may block VOIP traffic entirely.
Fixing Push-to-Talk and Voice Activation
Check your game settings to confirm the correct microphone is selected. Open Phasmophobia and go to Settings, then Audio. Select your microphone from the dropdown menu under “Microphone.”
Use the Voice Recognition Test button to verify your mic works properly.
Your push-to-talk key might conflict with other controls. Review your keybinds and assign a different key if needed. If you prefer voice activation, adjust the sensitivity slider so it picks up your voice without triggering from background noise.
Alt-tabbing out of Phasmophobia disrupts the voice chat system. Return to the game by clicking its icon on the taskbar rather than using alt-tab. This prevents the voice chat from disconnecting.
Addressing Overlay and Third-Party Conflicts
Discord and other voice apps can interfere with in-game voice chat. If you’re using Discord, open Settings and go to Voice & Video. Make sure the same microphone selected in Phasmophobia appears as your input device in Discord.
Disable Discord overlay if voice chat problems continue.
Steam overlay can also cause conflicts. Right-click Phasmophobia in your Steam library and select Properties. Uncheck “Enable the Steam Overlay while in-game” under the General tab.
Close unnecessary background applications that use your microphone. This includes recording software, other voice chat programs, and streaming tools. Only run essential programs while playing to avoid audio conflicts.
Network and Firewall Setup for Stable Voice Chat
Phasmophobia’s voice chat requires proper firewall permissions and network configuration to function correctly. Windows Firewall or third-party security software can block the game’s communication, while closed ports and corrupted network settings often cause connection problems.
Allowing Phasmophobia Through Firewall
Your firewall acts as a security guard for your network, and it needs to recognize Phasmophobia as a trusted application. If VoIP relies on SIP and RTP protocols, which can be disrupted by blocked ports or firewall restrictions, the game’s voice chat will fail to connect.
Open Windows Security and navigate to Firewall & Network Protection. Click “Allow an app through firewall” and look for Phasmophobia in the list.
If the game isn’t listed, click “Change settings” and then “Allow another app.” Browse to your Phasmophobia installation folder and select the executable file. Make sure both Private and Public network boxes are checked for the game.
Third-party firewalls like Norton or McAfee require similar steps. Check your security software’s application permissions and add Phasmophobia to the allowed list if voice chat problems persist.
Opening Required Network Ports
Phasmophobia uses specific network ports for voice communication and multiplayer functionality. Your router needs these ports open for incoming and outgoing traffic.
The game primarily uses UDP ports 27015-27030 and 27036 for Steam networking. Voice chat specifically relies on proper UDP packet transmission, which firewalls can interfere with if not configured correctly.
Access your router’s admin panel by typing your gateway IP address into a web browser. Navigate to port forwarding settings and create new rules for the UDP port ranges listed above. Point these rules to your computer’s local IP address.
You can find your local IP by opening Command Prompt and typing ipconfig. Look for the IPv4 address under your active network connection.
Resetting Network Settings
Corrupted network configurations can prevent voice chat from working even with correct firewall settings. Windows stores network data that sometimes needs clearing.
Open Command Prompt as administrator and run these commands in order:
ipconfig /flushdnsnetsh winsock resetnetsh int ip reset
Restart your computer after running these commands. This process clears your DNS cache and resets network adapters to default settings.
If voice chat still fails, verify integrity of game files through Steam. Right-click Phasmophobia in your library, select Properties, go to Installed Files, and click “Verify integrity of game files.” Steam will check for corrupted files and replace them automatically.
Fixing Game-Related and File Integrity Problems
Corrupted files or outdated drivers can prevent Phasmophobia voice chat from working properly. Steam includes built-in tools to scan and repair game files, while audio driver updates ensure your microphone connects correctly to the game’s voice system.
Verifying Integrity of Game Files in Steam
Corrupted or missing game files often cause Phasmophobia voice chat not working issues. Steam can verify integrity of game files to identify and replace damaged data automatically.
Open your Steam library and locate Phasmophobia in your games list. Right-click on the game and select Properties from the menu.
Navigate to the Files tab in the properties window. Click the Verify integrity of game files button and wait for Steam to complete the scan.
The verification process compares your installed files against Steam’s records. If Steam finds any problems, it will download fresh copies of the corrupted files automatically. This process usually takes a few minutes depending on your game installation size and internet speed.
Launch Phasmophobia after verification completes to test if your voice chat works. If the problem continues, the issue may be related to your audio drivers rather than game files.
Updating or Reinstalling Audio Drivers
Outdated or corrupted audio drivers can block your microphone from connecting to Phasmophobia’s voice server. Your audio drivers control how Windows communicates with your microphone and speakers.
Press Win + X and select Device Manager from the menu. Expand the Audio inputs and outputs section to view your audio devices.
Right-click your microphone device and select Update driver. Choose Search automatically for drivers to let Windows find the latest version. If Windows reports your drivers are current but voice chat still fails, you may need to reinstall them completely.
To reinstall drivers, right-click your microphone in Device Manager and select Uninstall device. Check the box that says Delete the driver software for this device if it appears. Restart your computer and Windows will automatically reinstall fresh audio drivers.
You can also download audio drivers directly from your motherboard or sound card manufacturer’s website for the most recent versions.
Reinstalling Phasmophobia
A complete reinstall removes all game data and settings that might be causing voice chat problems. This step should only be used after trying other fixes.
Open Steam and go to your library. Right-click Phasmophobia and select Manage, then Uninstall.
Navigate to your Steam installation folder after uninstalling. The default location is C:Program Files (x86)Steamsteamappscommon. Delete any remaining Phasmophobia folders to remove leftover files that Steam might not have removed.
Restart your computer before reinstalling. Open Steam, find Phasmophobia in your library, and click Install. Download and install the game fresh.
Launch the game and configure your microphone settings again in the audio menu. Test voice chat to verify the reinstall fixed the voice server connection issue that was preventing communication with other players.
Tips for Improving In-Game Communication
Good voice quality makes it easier for teammates to understand you and helps the ghost hear your commands through the spirit box. Adjusting your microphone settings and learning how the game’s voice system works will improve your overall experience.
Enhancing Clarity and Reducing Background Noise
Your microphone picks up all sounds around you, which can make communication unclear. Go into your computer’s sound settings and adjust your microphone input level to around 70-80%. This prevents your voice from being too quiet or too loud.
Check your microphone’s noise suppression settings in Windows or your audio software. Most modern microphones have built-in noise cancellation that filters out background sounds like fans, keyboard clicks, and room echo.
Position your microphone 6-8 inches from your mouth at a slight angle. Speaking directly into it causes harsh breathing sounds and pops on certain letters. A pop filter or foam cover helps reduce these issues.
In the Phasmophobia settings menu, test your voice activation threshold if you’re using voice activation mode. The game listens constantly in this mode, so setting the right sensitivity prevents it from picking up every small noise.
Using Voice Changers and Their Impact
Voice changers can add fun to the game but may affect how well Phasmophobia voice recognition works. The ghost needs to understand your words through the spirit box and during general interaction. Heavy voice modulation can prevent the system from recognizing your phrases.
If you want to use a voice changer, keep the effects minimal. Slight pitch changes usually work fine, but heavy distortion, robotic effects, or extreme alterations will break voice recognition. Test your setup in single-player mode first.
Some players report that setting voice changing software as their default microphone helps the game recognize it properly. Your teammates will still hear you through voice chat, but the ghost might not respond if the audio is too distorted.
Best Practices for Spirit Box and Ghost Interaction
The spirit box relies on voice recognition to detect specific phrases you say. You need to speak clearly and use exact wording from the game’s recognized phrase list. Saying “are you here” works, but variations like “are you around” won’t trigger a response.
Wait 2-3 seconds between questions to give the game time to process your voice. Speaking too quickly causes the system to miss your words. You can use either local chat or global chat for spirit box questions, and both work the same way.
Key phrases that work well:
- “Give us a sign”
- “How old are you”
- “Where are you”
- “What do you want”
If you’re using push-to-talk mode, you can start speaking slightly before pressing the button. The game recognizes phrases said up to 0.5 seconds after activating your microphone. Players who struggle with voice recognition can enable the text option in settings as an alternative to speaking.
Frequently Asked Questions
Players often need help adjusting their audio settings, selecting the right microphone, and understanding why voice communication fails during gameplay.
Where do I enable in-game voice chat in the audio settings?
You can enable voice chat by opening the game’s Options menu and navigating to the Audio section. Voice chat settings include three modes: Push-to-Talk, Toggle, or Voice Activation.
Push-to-Talk requires you to hold a button while speaking. Toggle lets you turn your mic on or off with a single button press. Voice Activation keeps your mic open at all times without needing to press anything.
How do I set the correct microphone input device so the game detects my mic?
You need to match your Input Device setting in the game to the actual microphone you’re using. Go to Options and then Audio to find the Input Device dropdown menu.
Select your active microphone from the list of available devices. If your mic isn’t listed, check your Windows sound settings to make sure the microphone is enabled and set as your default recording device.
What is the push-to-talk keybind and how do I change it on PC?
The default push-to-talk button is set when you first launch the game. You can customize this keybind by going into the settings menu and finding the controls section.
Local chat and global chat each have their own separate keybinds that you can assign to different keys. Make sure you don’t assign the same key to multiple functions to avoid conflicts.
How do I use proximity voice chat during a match?
Local chat is proximity-based and lets you communicate with players up to 20 meters away. Your voice will sound muffled if you’re on different floors or if one player is inside while another is outside.
You activate local chat by using your assigned keybind if you’re using Push-to-Talk mode. If you chose Voice Activation, the game will always hear you. Toggle mode requires you to press the button once to turn your mic on and again to turn it off.
Why can’t I hear my teammates or why can’t they hear me in voice chat?
Your microphone might not be selected correctly in the audio settings, or Windows might be blocking Phasmophobia from accessing your mic. Check your Windows privacy settings to confirm that apps have permission to use your microphone.
Dead players can hear living players, but living players cannot hear dead teammates. Phasmophobia uses the Vivox voice chat system, and sometimes bugs can prevent dead players from hearing each other clearly.
Firewall settings or network issues can also cause voice server connection problems. Make sure Phasmophobia is allowed through your Windows Firewall and that your internet connection is stable.
What steps are needed to enable voice chat on Xbox or PS5?
Console players need to ensure their headset is properly connected to their controller or console. Check your console’s system settings to verify that the microphone is enabled and set as the active input device.
Go into Phasmophobia’s audio settings and select your headset from the Input Device menu. The game should automatically detect USB headsets and wireless gaming headsets that are compatible with your console.